


Smart solution for fermentation monitoring
The Nautilis iRelay Premium Plus is an advanced device designed to receive, process, and distribute data from digital hydrometers iSpindel and HYDROM. It ensures reliable fermentation tracking by displaying data on a 2″ round TFT screen, accessing it via the local web interface, or forwarding it to supported applications.
Supported fermentation monitoring platforms:
✅ MQTT / Home Assistant
✅ BrewSpy
✅ Brewfather
✅ Monitor.Beer
✅ Grainfather
✅ Little Bock
✅ Brewers Friend
✅ BrewBench
✅ UbiDots
✅ HTTP
Exceptional WiFi connectivity
✅ Tested in extreme conditions:
The hydrometer was placed inside a 2 mm thick stainless steel fermenter with a 6 mm thick lid and locked in a freezer. The signal still penetrated easily.
✅ Energy efficiency:
Due to its reliable connection, iSpindel consumes less battery, significantly extending its lifespan.
✅ Internet-independent operation:
- iSpindel no longer requires the internet to send data to iRelay.
- iRelay also does not need the internet unless remote monitoring is required via one of the supported apps.
Power and charging
🔌 Powered via a standard 5V USB-C charger (mobile phone charger).
⚠️ Recommended cable: USB-A to USB-C (not compatible with USB-C to USB-C cables).
⚡ Ultra-low power consumption.
Additional features
Faster hydrometer calibration
✔️ Displays the tilt angle to assist with precise calibration.
✔️ Rotatable display for ultimate flexibility.
Wireless firmware updates (OTA)
✔️ Regular firmware improvements via the web interface.
✔️ No need for physical connection to a computer.
Supports two iSpindel hydrometers simultaneously
✔️ Audio confirmation tone when saving settings.
✔️ Alarm for high or low hydrometer temperature.
✔️ Notification when the specific gravity (SG) drops below a set threshold.
Automatic SG and temperature correction
✔️ Applied to both the display and Blynk app.
✔️ Option to choose between Plato and SG units.
✔️ Plato-to-SG conversion available in the iRelay web interface (affects display only, apps receive raw iSpindel data).
Add-ons: Thermometer, Pressure Sensor & Decorative LED Lighting
🌡️ External or ambient thermometer
✔️ Alarm when temperature is too high or too low.
✔️ Extendable sensor cable without affecting accuracy.
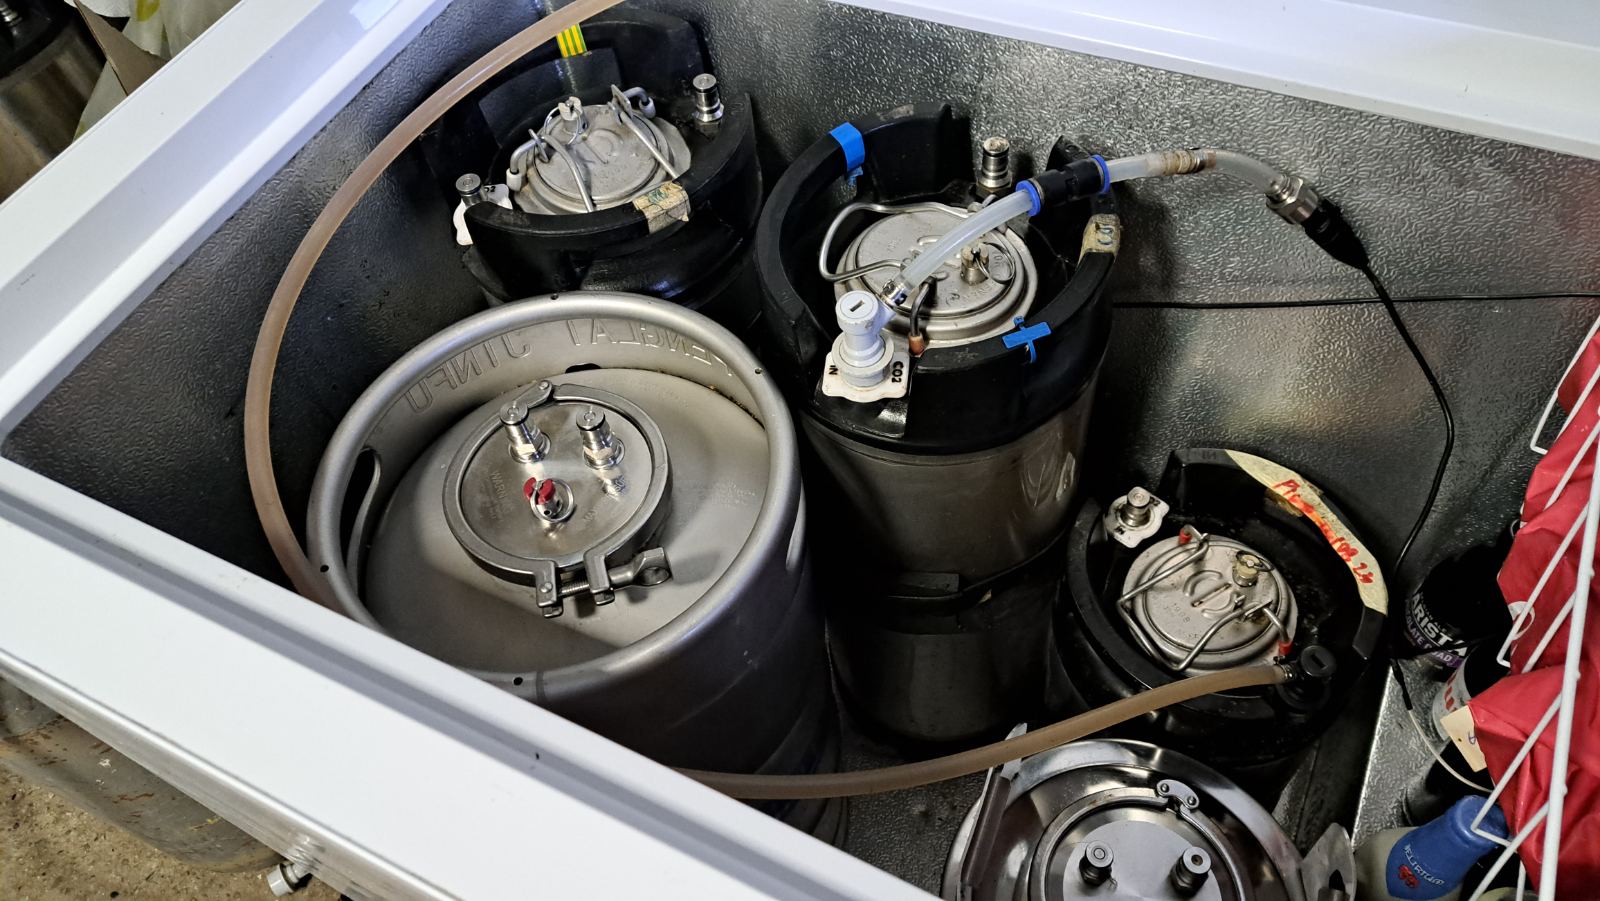
✔️ Fermentation monitoring: Can be placed on the fermenter shell to prevent temperature controller failure (STC-1000).
✔️ Temperature unit selection: °C or °F.
✅ Integration with:
- Homeassistant, BrewSpy, Brewfather, Grainfather (temperature updates every 1.5 or 15 min).
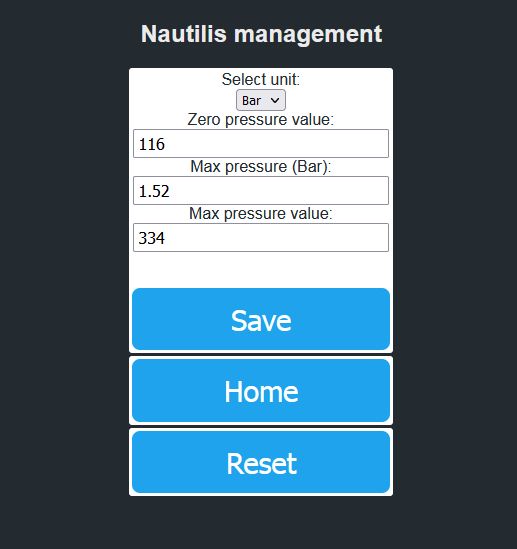
🔄 Nautilis iRelay NXT-P (Pressure Sensor)
✔️ Displays pressure readings on-screen and sends data to applications.
✔️ Compatible applications:
- Homeassistant (min 10 sec interval)
- BrewSpy (min 5 min interval)
- SensorSpy (min 5 min interval)
- Brewfather (min 15 min interval)
✔️ Alarm notifications via mobile apps.
✔️ Units: Bar or PSI.
⚠️ The pressure sensor is sold separately.
🔗 Order here.
Decorative LED Lighting
The decorative LED lighting is blue and can be turned off if needed. It adds a stylish touch to the iRelay case, especially when a magnet is attached to the case, allowing it to stick to a fridge for a sleek and modern look.
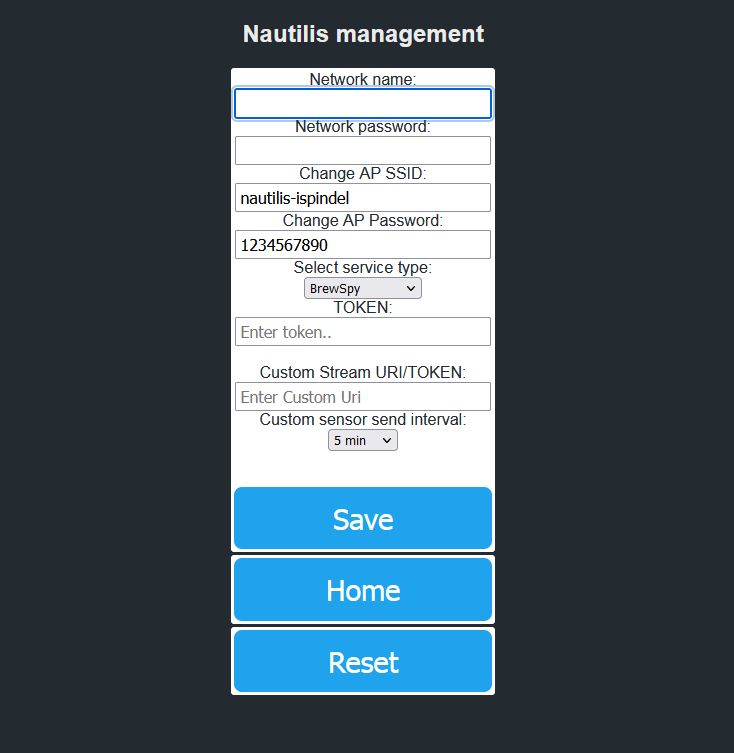
Nautilis iSpindel and iRelay settings
1. Configuring Your iSpindel
-
Turn on your iSpindel.
-
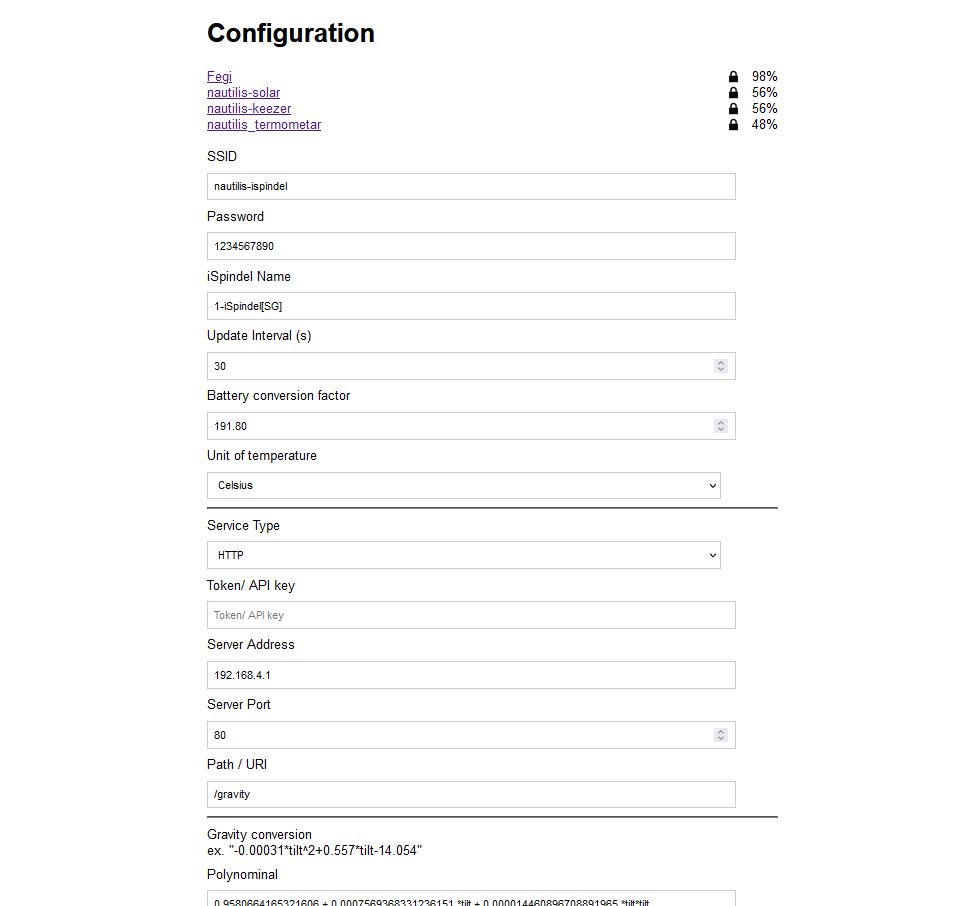
Open WiFi Manager and enter the following:
| Field | Value |
|---|---|
| SSID | nautilis-ispindel (or your custom AP SSID) |
| Password | Written on the device paper or your custom AP password |
| iSpindel Name | 1-YourName[SG] (first character must be a number; max 16 characters; [SG] required for Brewfather) |
| Service Type | HTTP |
| Token | Leave blank |
| Server Address | 192.168.4.1 |
| Server Port | 80 |
| Path/URI | /gravity |
-
Tip: If using two iSpindels, name the second one
2-YourName[SG]. -
Don’t forget calibration: Use the SG calibration table available here
2. Connecting iRelay to WiFi
-
Connect to the WiFi network transmitted by the relay (
nautilis-ispindelby default). -
Open a browser and go to:
192.168.4.1to access the Nautilis Controller Management page. -
From here, you can view and edit:
-
WiFi and service configurations (Blynk, UbiDots, Brewfather, etc.)
-
AP SSID & Password (firmware ≥ 6.3.1)
Note: If you change the AP SSID/password, update the iSpindel configuration accordingly.
3. Configuring Online Services
You can integrate your iRelay with several platforms. Always ensure network names and passwords are case-sensitive.
UbiDots
-Select UbiDots service.
-Enter your API Token in the Custom Stream URI/TOKEN field.
-Set the temperature sending interval in the thermometer menu.
-Can support multiple hydrometers (max 2 per iRelay).
Brewfather
-Select Brewfather service.
-Enter your personal PATH/URI (e.g., /ispindel?id=123456789).
-Can support multiple hydrometers (max 2 per iRelay).
-Temperature data is updated every 15 minutes.
BrewSpy
-Select BrewSpy service.
-Enter hydrometer token.
-Can support multiple hydrometers (max 2 per iRelay).
-Minimum data sending interval: 300s (5 minutes).
MQTT (for Home Assistant or other systems)
-Select MQTT service.
-Enter MQTT Server, username, password.
-Port is fixed at 1883.
-Minimum sending interval: 10 seconds.
-Can support multiple hydrometers (max 2 per iRelay).
-Integrate with Home Assistant using MQTT auto-discovery.
HTTP Service (e.g., Fermentrack)
-Select HTTP service.
-Enter TOKEN, HTTP Server, URI.
-Can support multiple hydrometers (max 2 per iRelay).
-Port is fixed at 80.
-Minimum sending interval: 10 seconds.
Grainfather
-select Grainfather service type or HTTP
– Enter Server URL from ispindel instructions into URI/PATH field; leave the other fields empty
– For HTTP service type enter all data from iSpindel instructions.
– Grainfather allows receiving only one iSpindle per iRelay
-Minimum sending interval: 900s
Monitor.Beer, Little Bock, Brewers Friend, BrewBench
-Follow similar steps: network name & password, service type, PATH/URI or TOKEN.
-Ensure sending interval is ≥ 15 minutes for iSpindel.
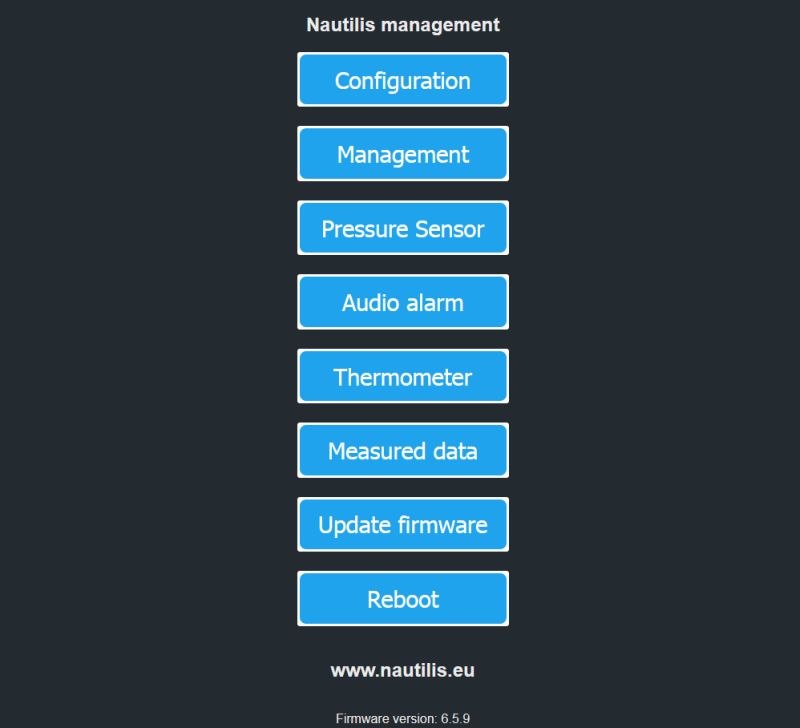
4. Management Options in the Controller
-
Firmware OTA update – upgrade wirelessly through the management page.
-
Audio alarm – enable/disable as needed.
-
Hydrometers – select number, SG/Plato unit, P-to-SG conversion, gravity alarm.
-
Pressure sensor – enter calibration data.
-
Thermometer – enable/disable, select °C or °F, set low/high alarms.
-
Measured data – view current readings.
-
Reboot – restart the device from the management page.
5. Tips
-
First-time connection: the iSpindel name is saved on the server; only then can you use it in the app.
-
Ensure calibration formulas are correctly pasted into the service configuration.
-
For multiple iSpindels or relays, use unique network names and device names to avoid conflicts.

How to connect wires and pipes to a pressure sensor
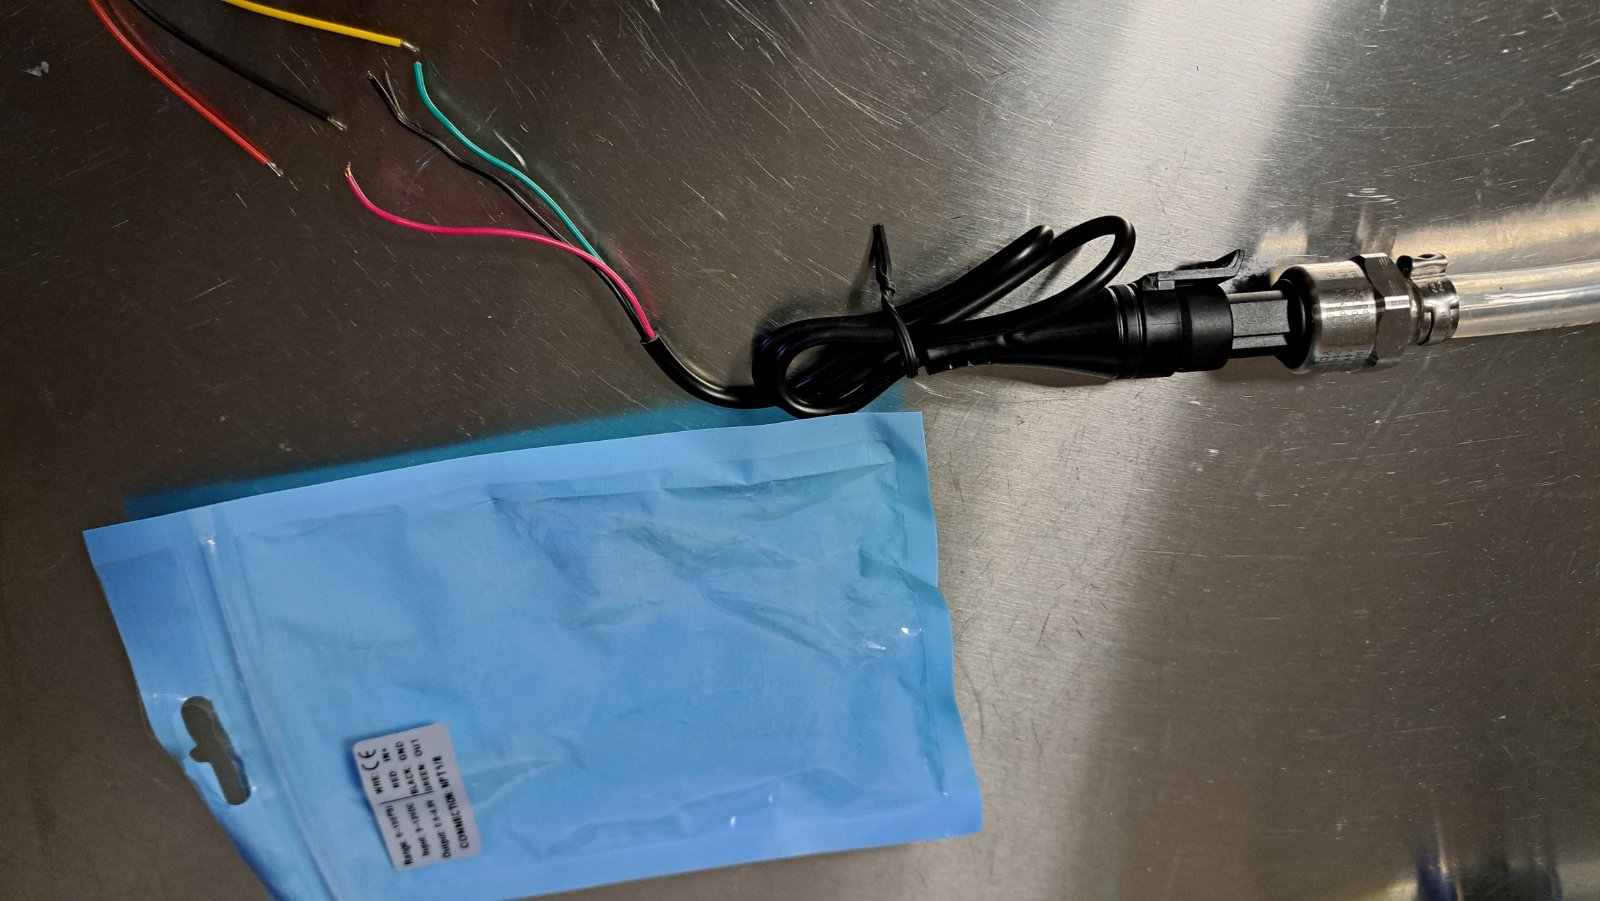
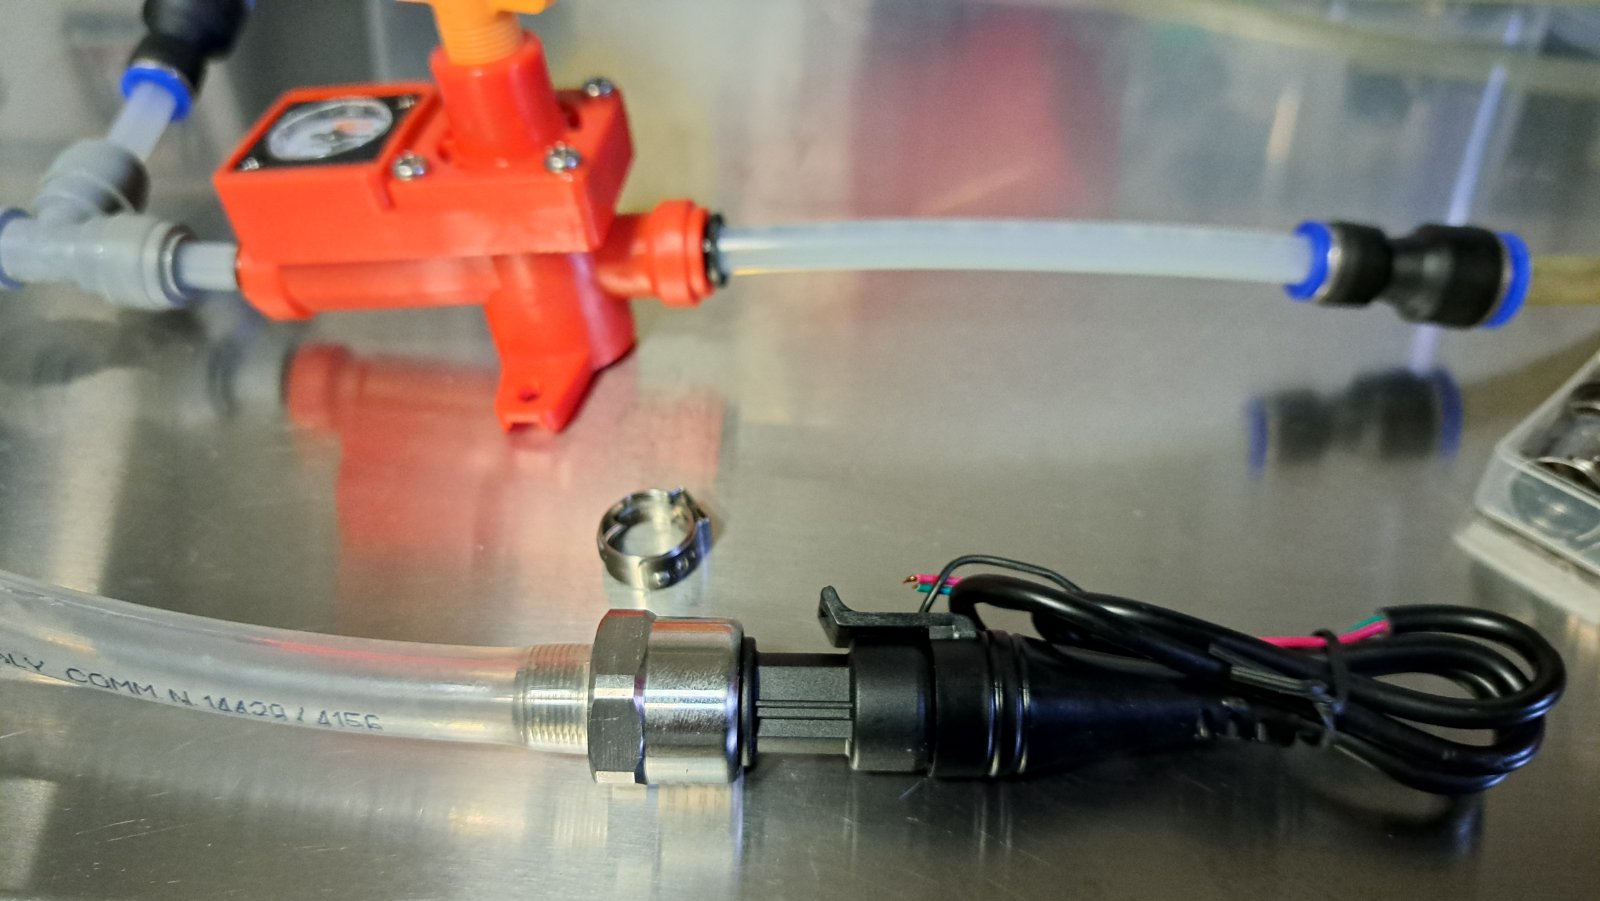
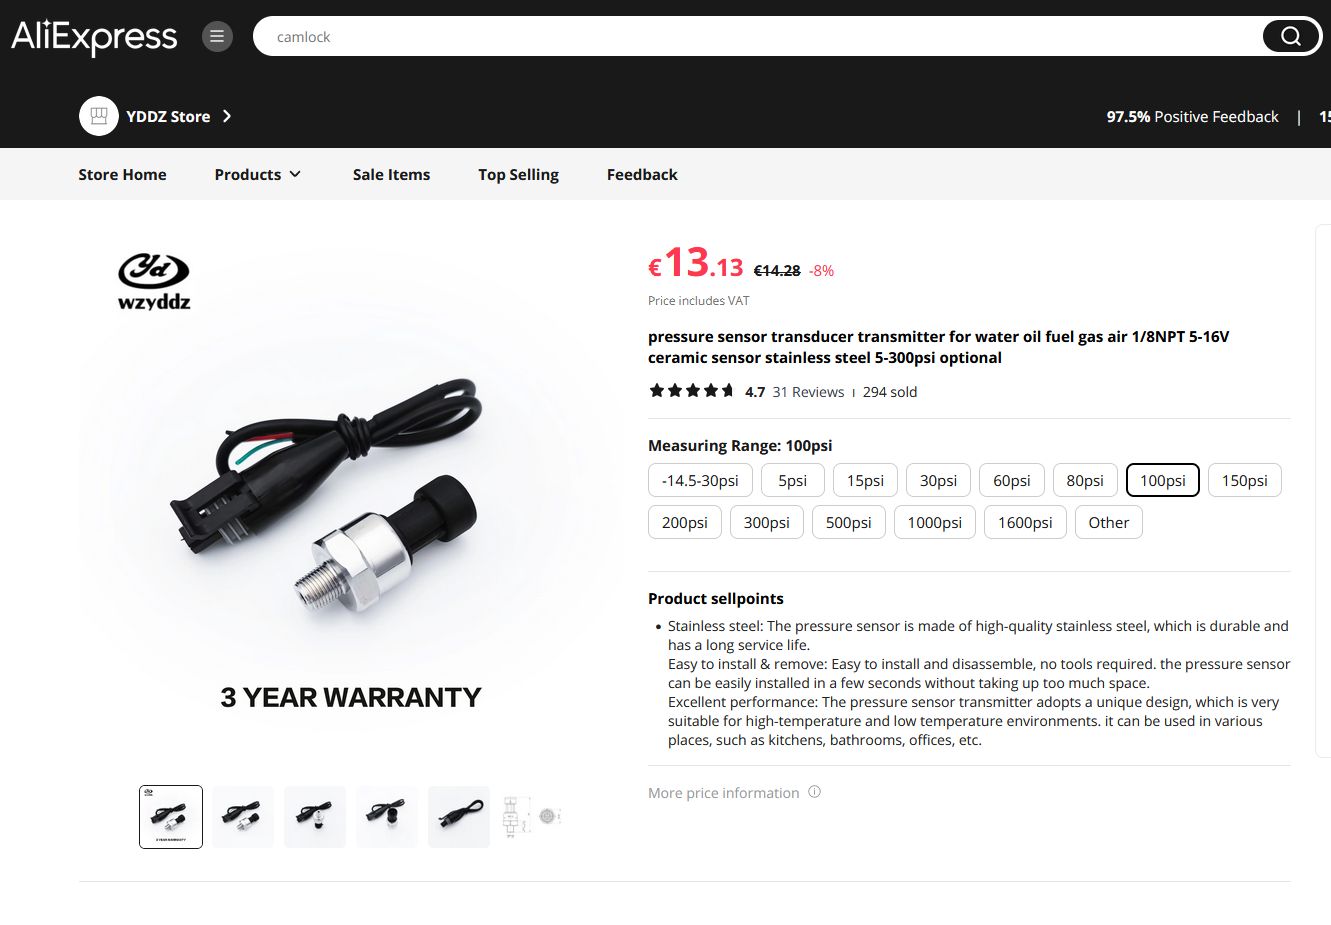
With iPressure or iRelay supporting the pressure sensor, you will receive all the preparation in the device with wires that connect to the internal connector. You only need to connect 3 wires from the pressure sensor to them. The pressure sensor has wires in 3 colors: Black, Red, and most commonly Green. Connect the black sensor wire to the black device wire, the red sensor wire to the red device wire, and the green sensor wire to the yellow device wire. If you want to extend the sensor wire, you can also do so with any thin wire without affecting measurement accuracy. Finally, protect the wire with heat shrink tubing.
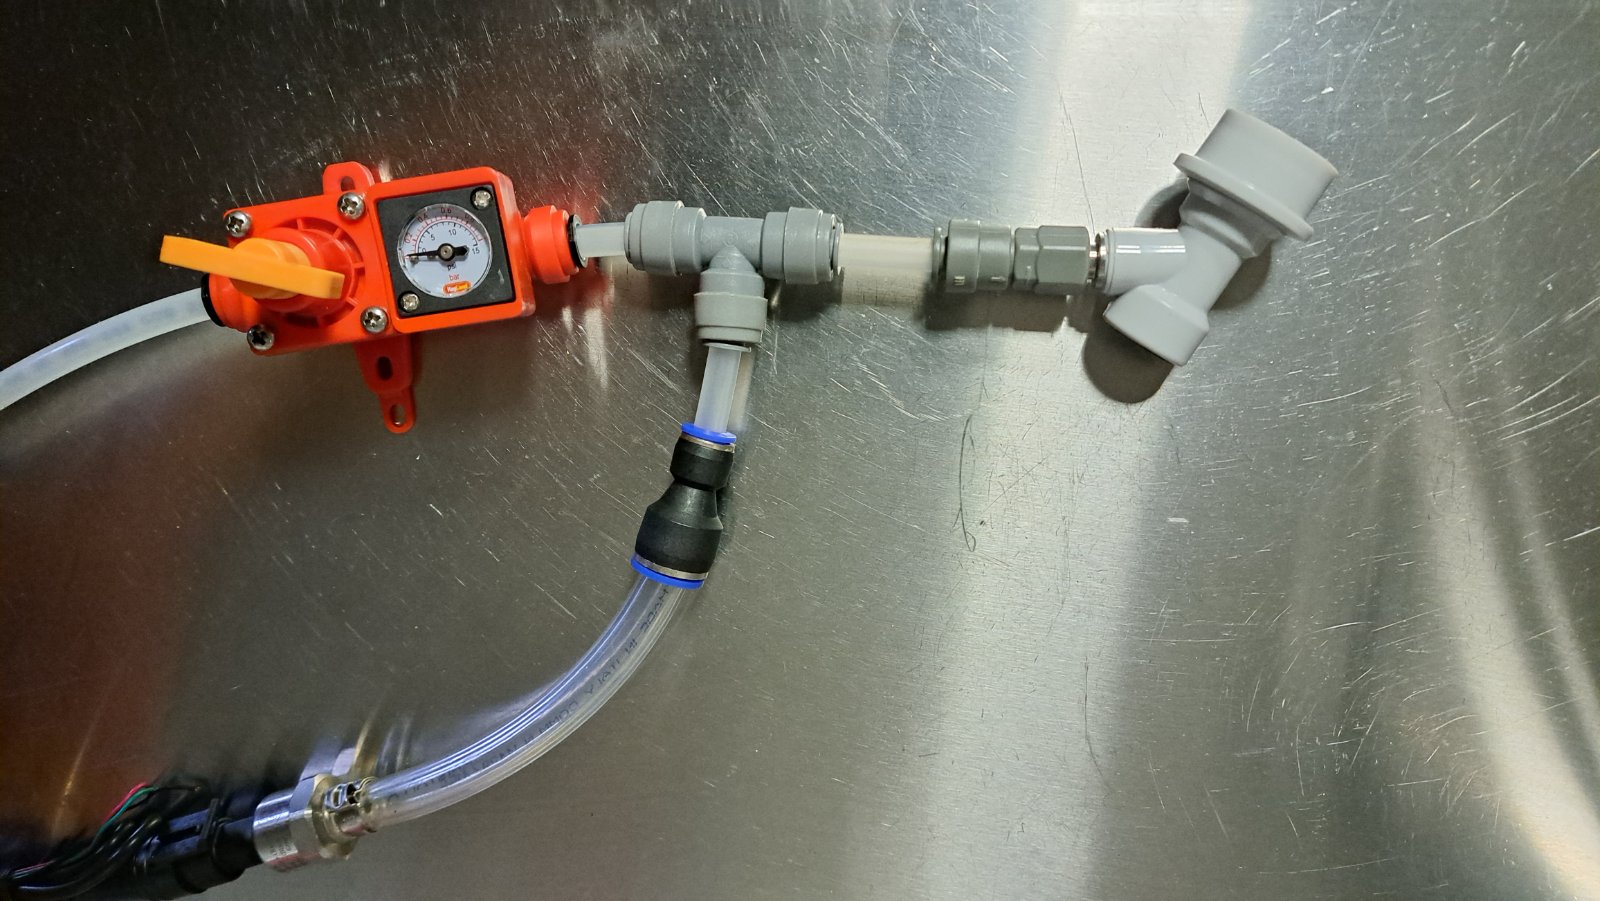
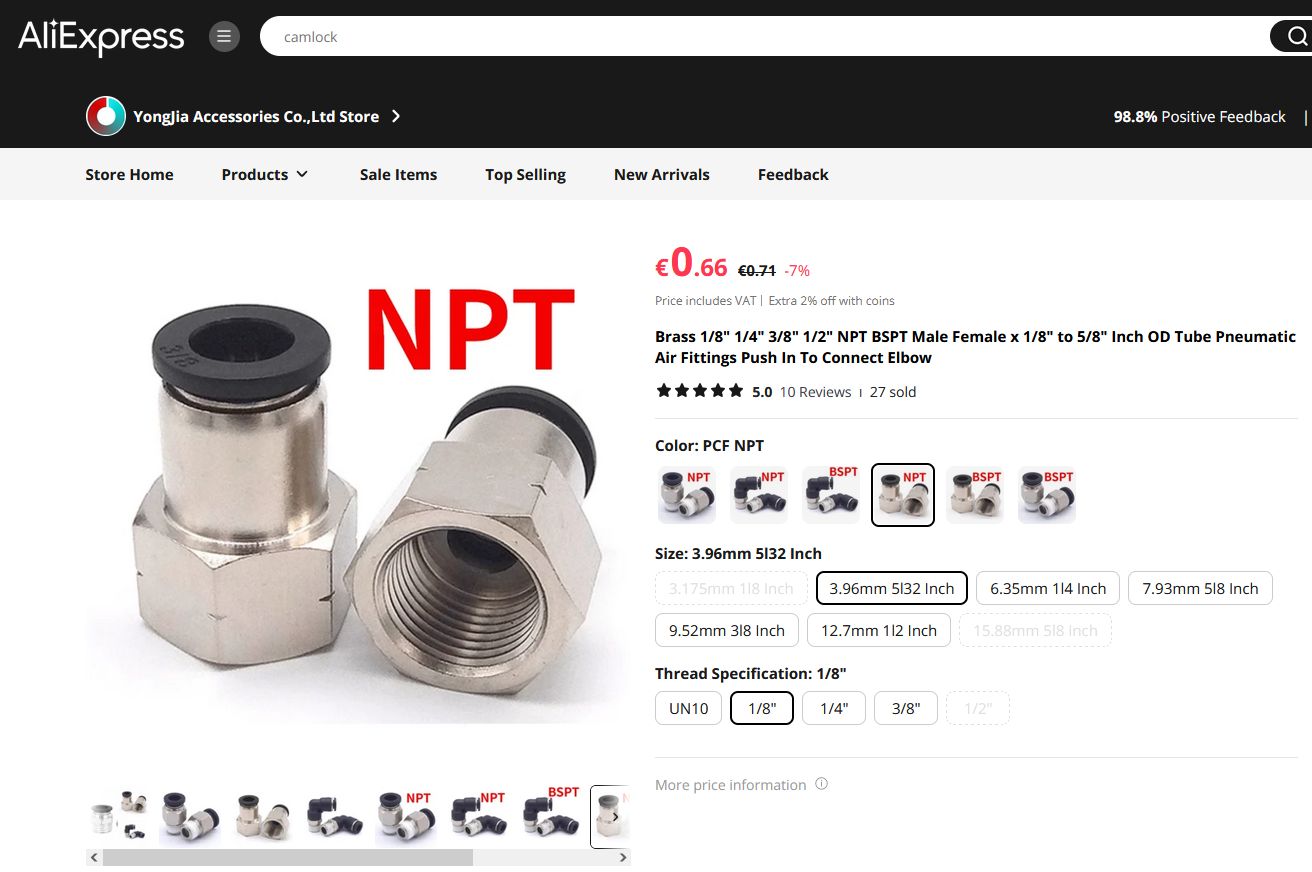
To connect pipes to the pressure sensor, you have several options: The simplest method is to purchase a Brass 1/8″ NPT Female to 5/8″ Inch OD Tube Pneumatic Air Fitting. Then, you only need an 8mm tube that connects to the Kegland Spunding Valve. If you don’t have the fitting, there is also a DIY method you can use. You can thread a 12mm tube onto the sensor and secure it with a hose clamp. Then, attach a reducer to the 12mm tube to match the size of the tube you are using.