
iSpindel WiFi relay (iRelay) Light – Device is no longer available.
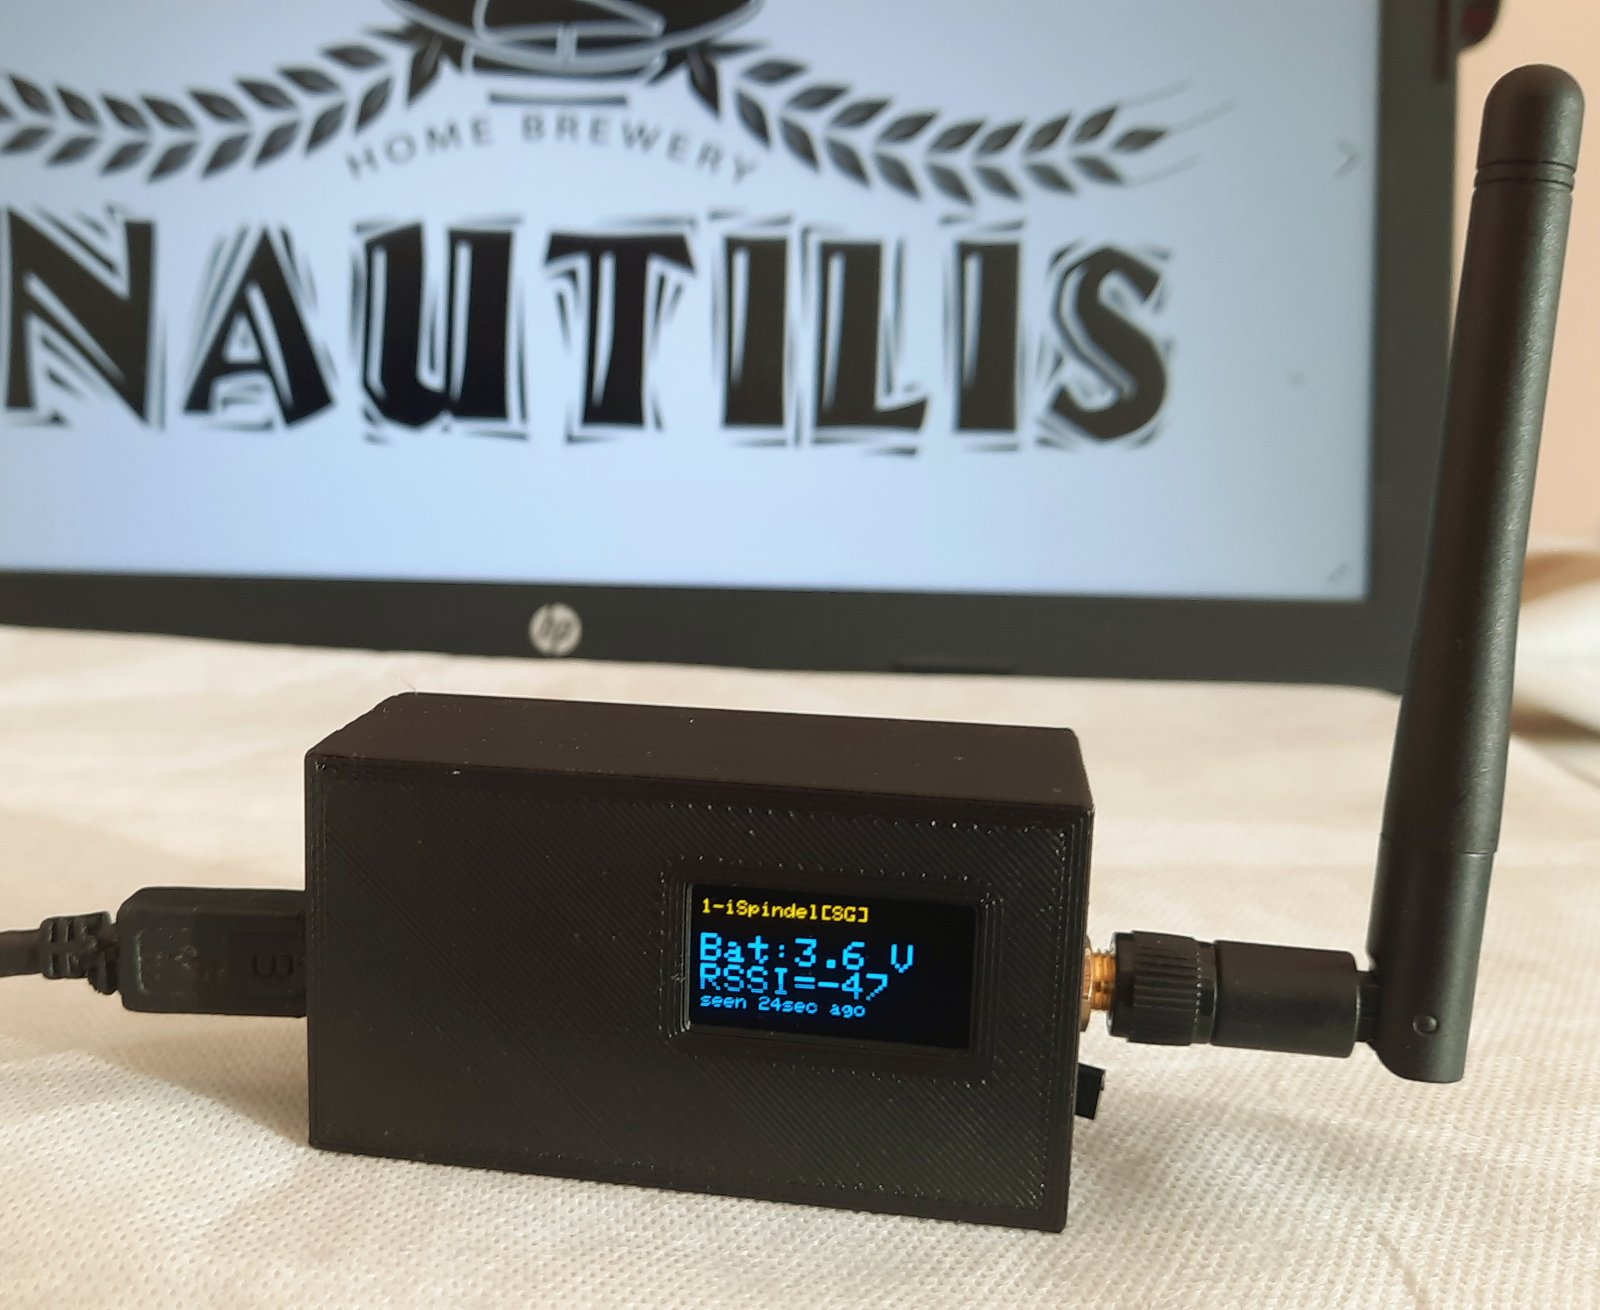 There are 3 versions of relay. Light with 0.96 “Screen, Basic with 2” Color Screen and Thermometer on Case and iRelay+ with 2 “High Resolution Screen. The light version of the relay has a small 0.96 “OLED display showing basic information. Spindle name, Temperature, SG, Signal, Battery and when last seen. iSpindel WiFi relay is a device used for signal amplification and connection of a digital hydrometer – iSpindel, processing of received data and further distribution according to fermentation monitoring applications. The data measured by the hydrometer is displayed on a large TFT display, can be viewed via the local relay website or sent to the Blynk mobile application where graphs, analytics, remote insight into the state of the fermenter and more are available. After version 6, it is possible to send hydrometer data to the following services: UbiDots, BrewSpy, Brewfather, Monitor.Beer, Grainfather, Little Bock, Brewers Friend, BrewBench. The last time the hydrometer data was read, as well as the density, temperature, battery voltage, signal strength, name of the hydrometer, are shown on the device screen and website. The signal strength of the iSpindel WiFi relay was tested by placing the hydrometer in a 2mm thick steel barrel and a 6mm lid without a rubber seal with a stainless steel clamp system, and placed the barrel in a closed freezer. And in such conditions, the signal easily broke through to the hydrometer.
Due to its extremely reliable connectivity, iSpindel consumes noticeably less power and thus lasts longer. iSpindel WiFi relay is powered by a 5V micro USB cell phone charger that can also be used to charge your hydrometer battery, and your power consumption is negligible. The iSpindel hydrometer no longer needs the Internet, and WiFi relay it doesn’t need either. Now the internet connection is only needed when you need a remote insight into the fermentation state via the previously mentioned applications. The gadget can greatly facilitate and speed up the calibration of the iSpindel hydrometer, as it displays an angle.
The relay firmware is constantly being upgraded and improved. Firmware upgrades, if necessary, they upgrade wirelessly via OTA (Over the Air) and the device’s web interface.
Currently 2 iSpindel hydrometers can be connected to the iSpindel WiFi relay. From firmvare V5.8.1 any irregularities or warnings on the display are shown in red colour. A confirmation tone sounds when saving the settings and a continuous alarm occurs at too low or too high hydrometer temperature and when the specific gravity falls below the value you specify.
iSpindel relay has posibility of entering OG for 2 hydrometers from which % ABV and attenuation are then automatically recalculated. The latest firmware has SG and temperature correction for both iSpindels applied to the Display and Blynk Application.
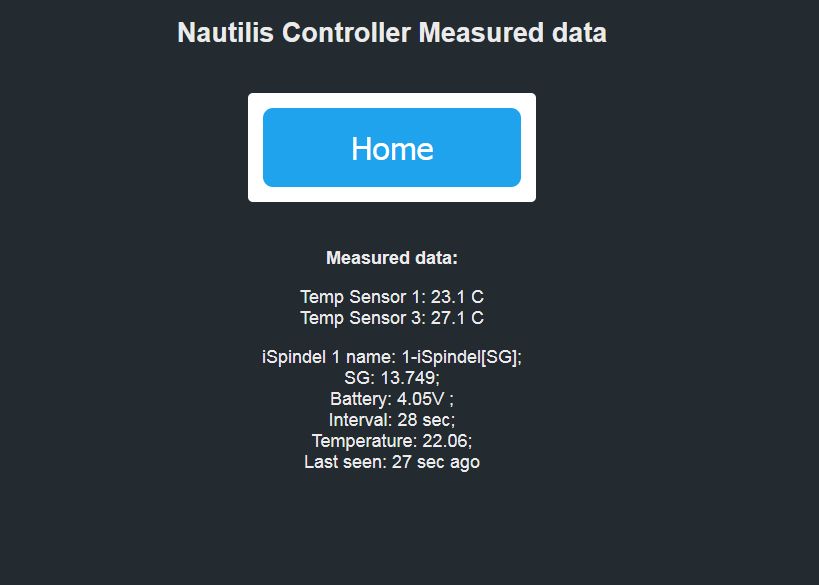
The battery status of the iSpindel is displayed as a graphic icon showing the battery voltage and as a percentage of the remaining voltage. Next to the battery status icon is a graphic display of the signal strength according to the hydrometer, and next to it is a graphic display of the signal strength according to the home WiFi network. If the Relay is not connected to home WiFi then the “D” (Disconeconnected) mark is visible instead of the signal strength display.
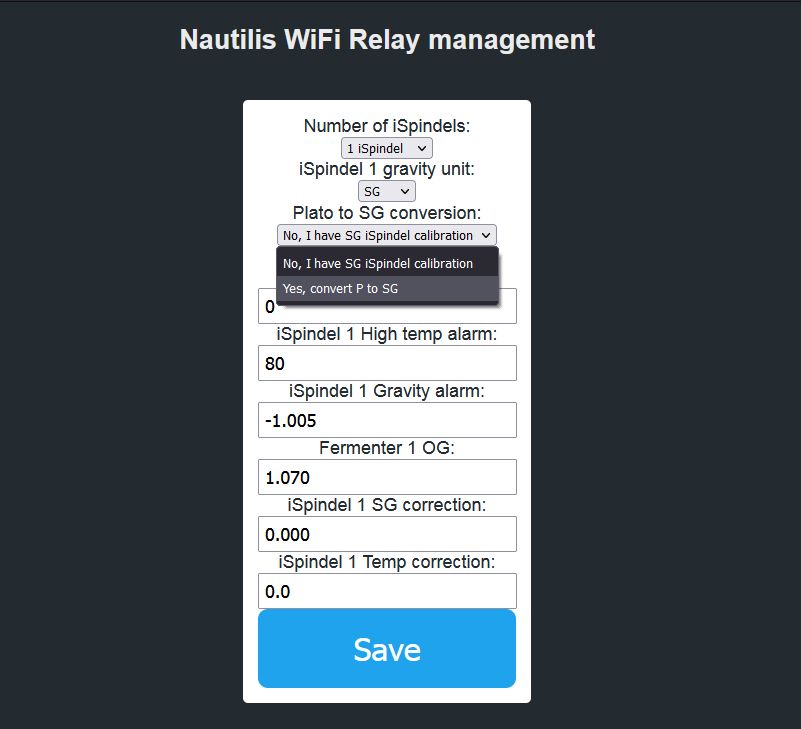
If you use Plato degrees instead of SG, then you can change the density unit for each iSpindel in the settings.
If you accidentally calibrated the iSpindel in the Plato unit, you can convert P to SG in the management settings of relay local web site. This only applies to iRelay, while the application receives the original iSpindle data.
The device only works on 2.4ghz WiFi network.
Additional thermometer
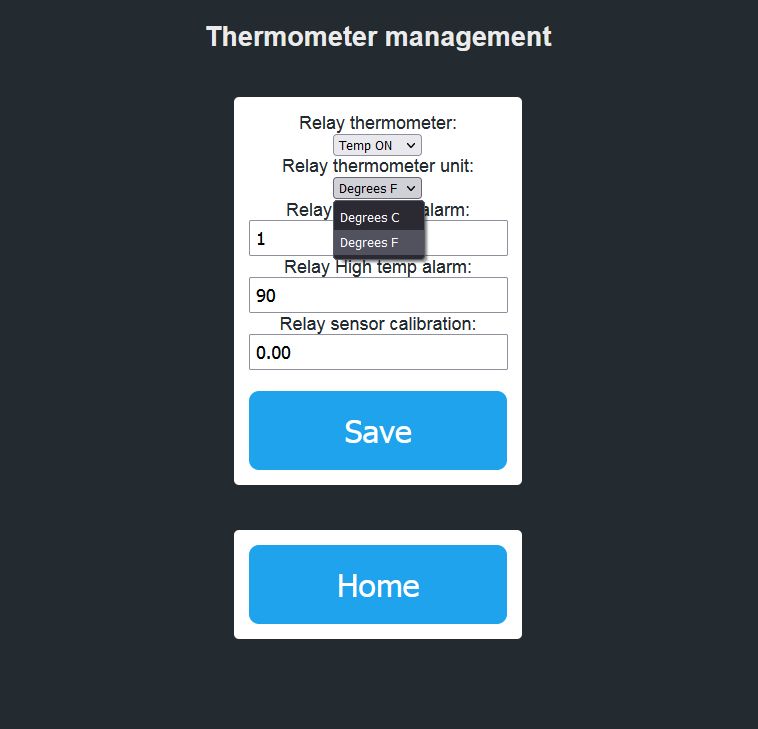
The outdoor or ambient thermometer has the ability to alarm you when temperature too high or too low is. The length of the sensor can be extended without affecting the measurement. Also, this thermometer can be placed on the fermenter shell and serve as protection against fermentation temperature controller failure (STC – 1000). In the thermometer settings, you can select the unit in degrees C or degrees F.
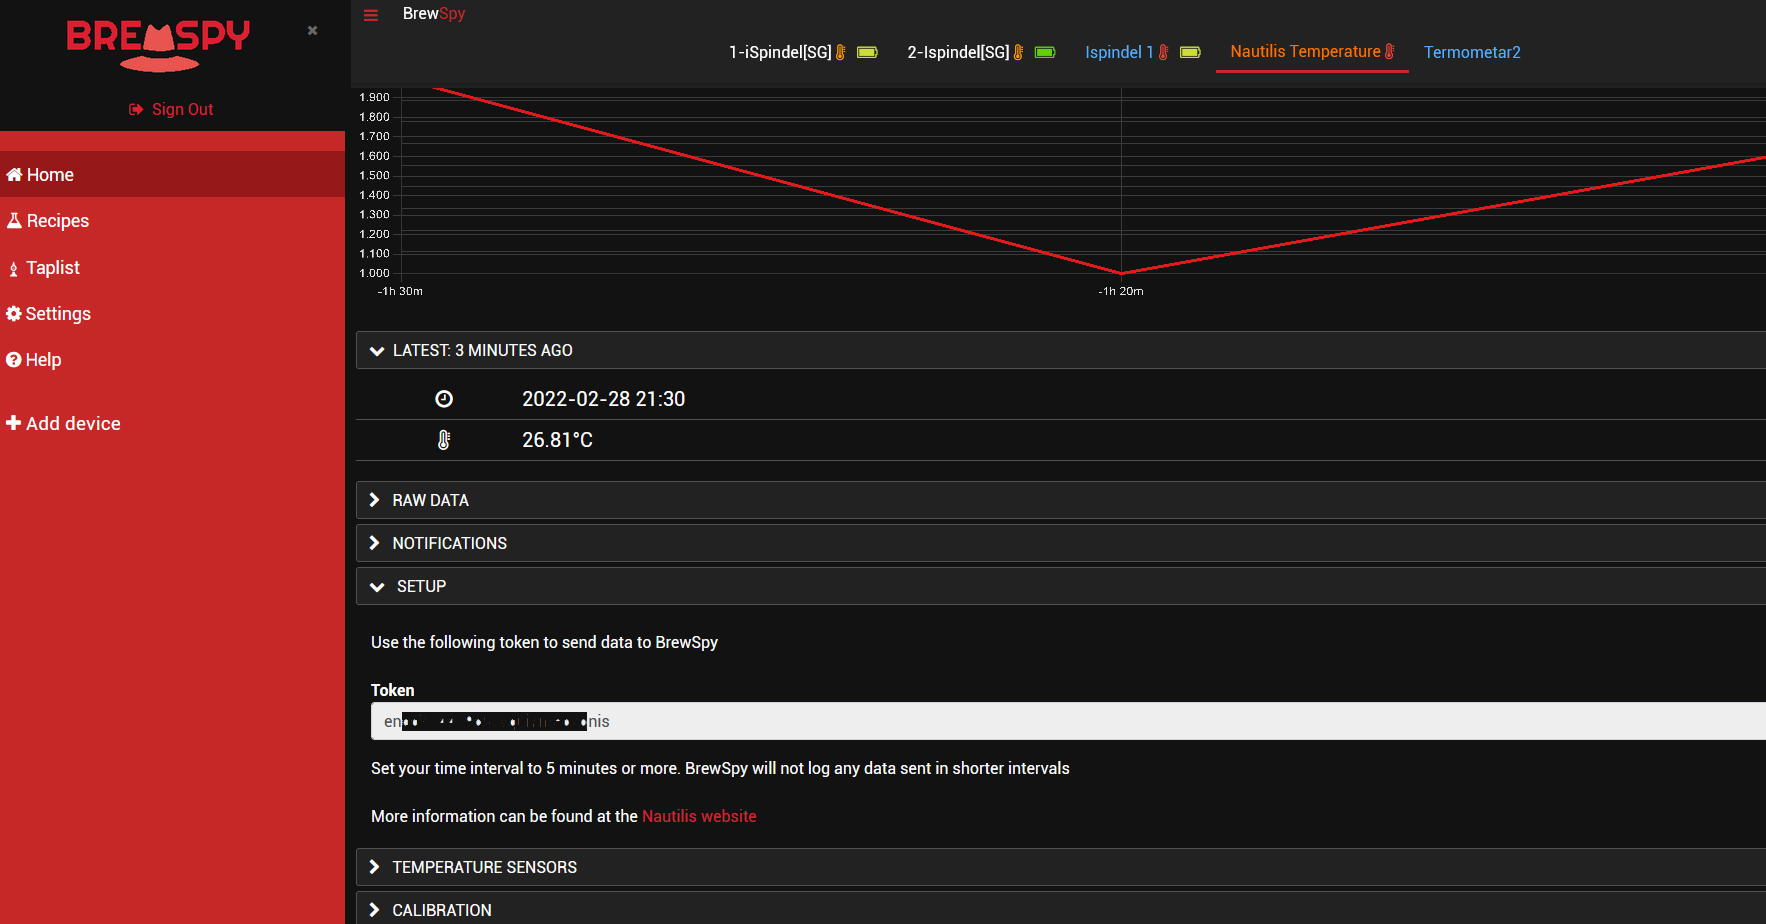
If the relay has a built-in temperature probe then you can add a BrewSpy new device, Brewfather Custom Stream device or Grainfather custom controller to display temperature on the BrewSpy, Brewfather or Grainfather app. Temperature appears in the interval of 1,5 or 15 minutes and is sent independently of the interval of the iSpindle.


How to use Nautilis iSpindel WiFi Relay?
To turn on, use a Micro USB mobile phone charger that is declared exactly at 5V and a minimum of 700mA.
First change settings on the Ispindel management
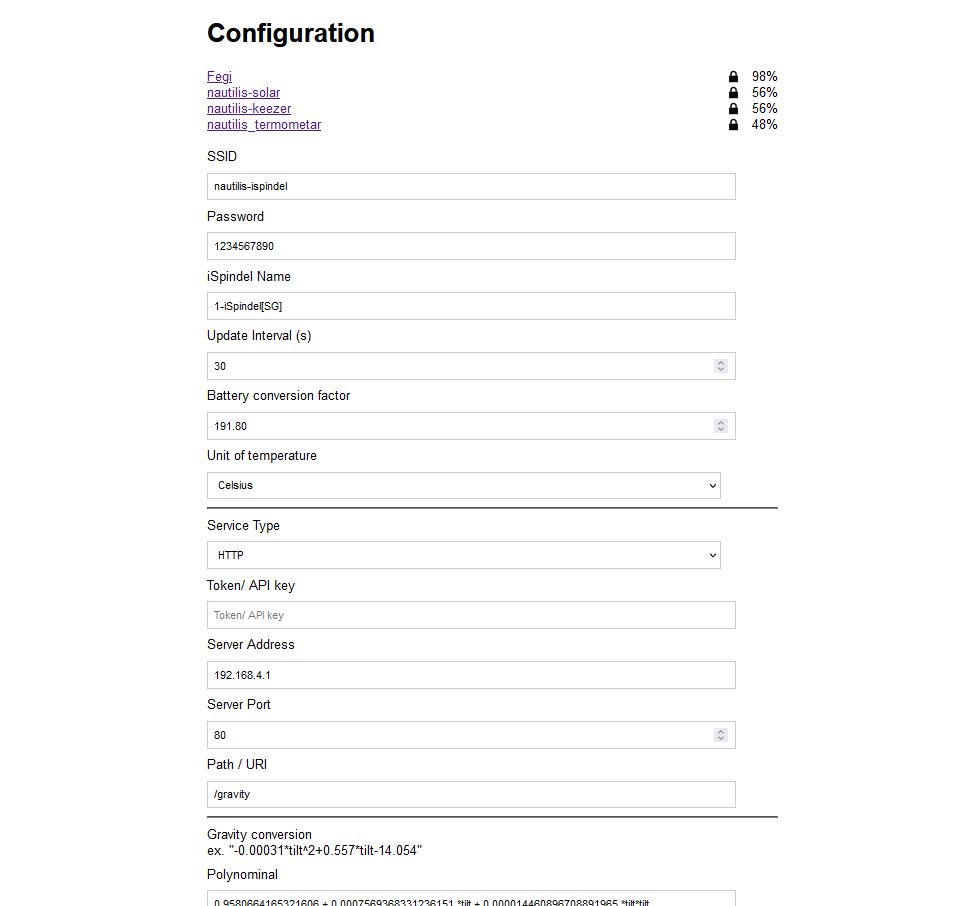
Turn on your Ispindel and change the Configuration parts in the WiFi manager to:
SSID: nautilis-ispindel (If you have changed the AP SSID then enter the changed ssid here.)
PASS: nautilis-ispindel ssid password (If you have changed the AP Password then enter the changed pass here. The relay comes with a piece of paper with your password written on it.)
iSpindel name: 1-enter_your_name[SG] //The first character of the name must be a number; for Brewfather add [SG] on the end, without spaces. A maximum of 16 characters may be in the name of iSpindel. Some special characters take up more space, so make that number smaller. If the name is too large, there is a possibility of periodic resetting of the device.
Service Type: HTTP
Token: leave blank! // If there is a space here, the device will not connect.
Server address: 192.168.4.1
Server port: 80
Path/URI: /gravity
Don’t forget on the calibration formula! Use the SG calibration table located at this link.
If you use 2 iSpindels:
All settings are the same as on the first iSpindel, except that the name of the second iSpindel must start with the number 2:
iSpindel name: 2-enter_your_name-[SG] // first digit and then name and finally [SG] for brewfather
Nautilis Controller management system
View and edit relay settings (no internet required)
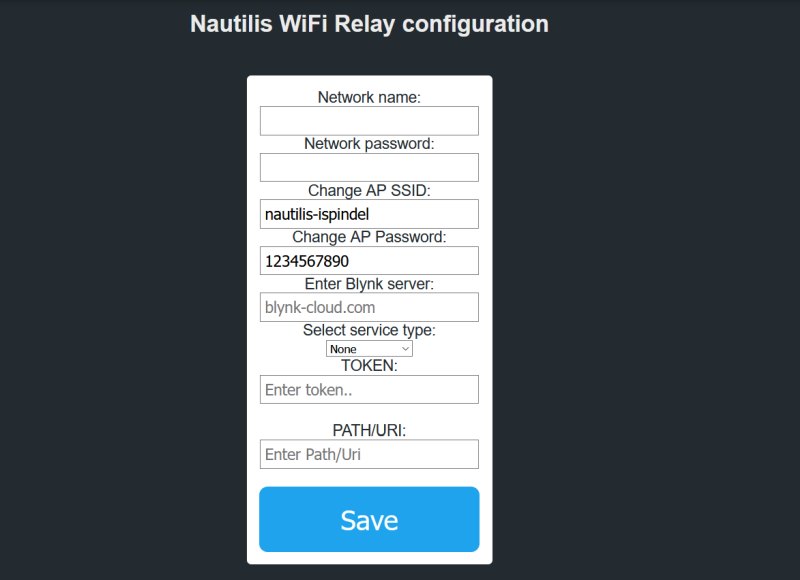
To view and change the device settings, first connect to the WiFi network that the device transmits, which is usually: nautilis-ispindel. After connecting to the network, some devices automatically open the Internet browser, and some require you to open the Internet browser and go to the address: 192.168.4.1
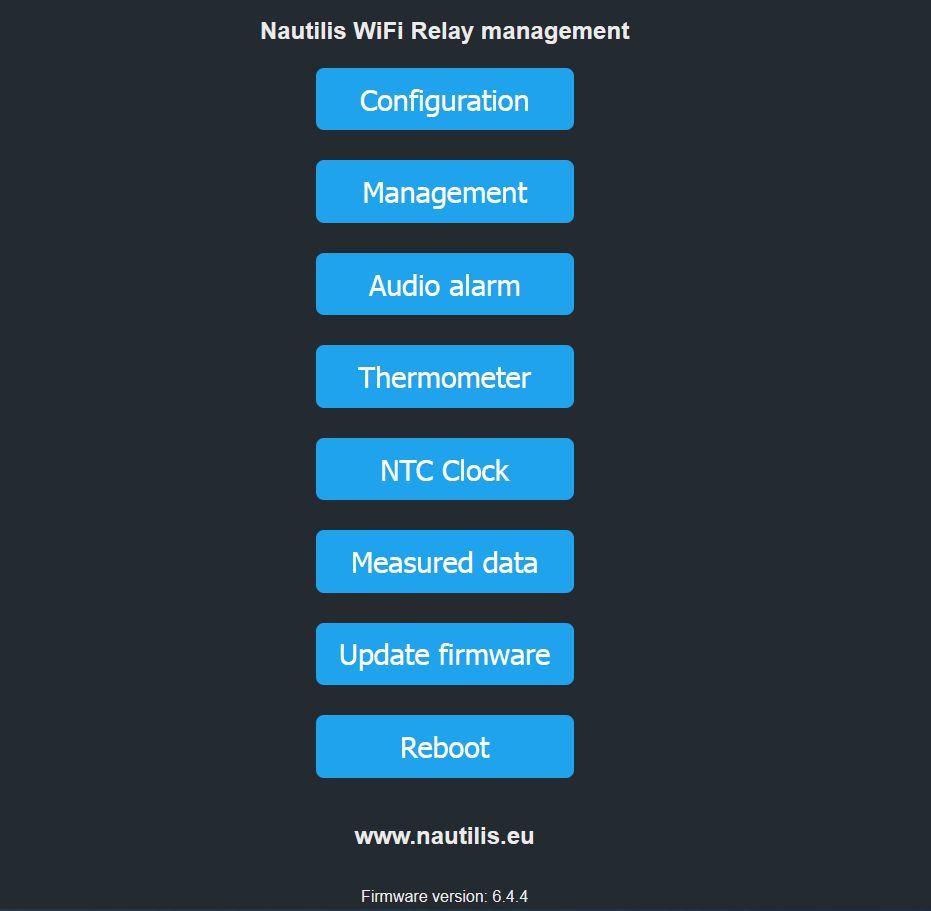
After that, the Nautilis Controller managment home page opens where you can view and edit the following settings:
-Configuration (configuration of your WiFi network,Blynk and other services)
Leaving one of the fields blank will save it as blank. The current settings view is at the bottom of the page. After saving, the device needs to be physically restarted, or you can use the Nautilis Controller management and the Reboot menu to make the changes active.
AP SSID & PASSWORD
As of firmware version 6.3.1, it is possible to update and change the AP SSID and password. This means that if you change it you have to change it on the iSpindel settings as well. Now the WiFi network transmitted by the relay can have the name of your choice. Do not use special characters, spaces, or more than 16 characters in the network name. When using 2 or more relays, the WiFi network names must be different between them.
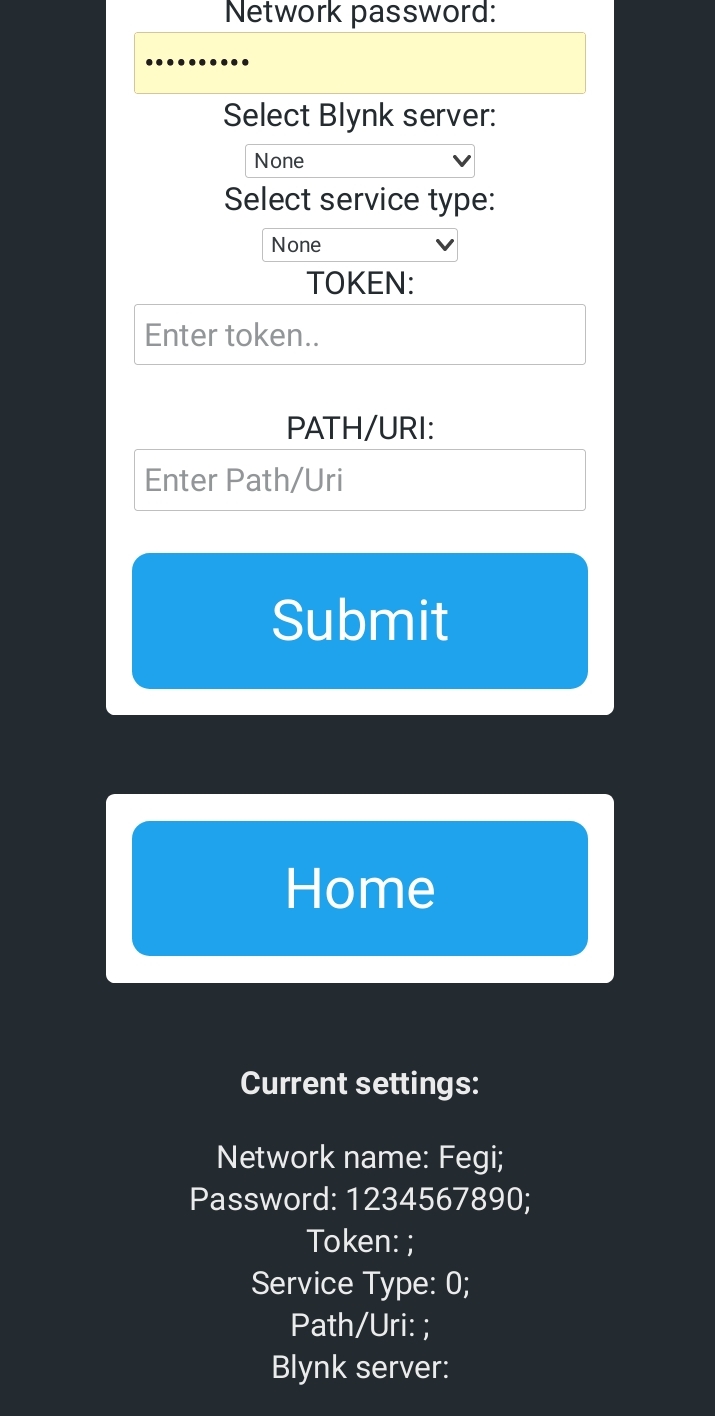
 To set up the Blynk service, you need to:
1. Network name (watch out for your WiFi network – be case sensitive), 2. Network password 3. Select Blynk server, 4. TOKEN (Blynk token)
Unclaimed fields must be empty.
 To set up the UbiDots service, you need:
1. Network name (watch out for your WiFi network – be case sensitive), 2. Network password (select your WiFi network password) 3. Select service type (check Ubidots), 4. TOKEN (your API token in your Ubidots STEM account)
Unclaimed fields must be empty. Please change your iSpindel name so that it only includes letters, numbers, periods, hyphens or underscores. [] in the name is unaccepted for Ubidots.
Ubidots new device to send the temperature of the thermometer from the relay: The Ubidots service must be marked and stored on the relay. Then a new field appears in the relay settings: Custom Stream URI/TOKEN in which you need to paste the Ubidots Token. Select the sending interval in the Thermometer menu.
 To set up a Brewfather service, you must:
1. Network name (watch out for your WiFi network – be case sensitive), 2. Network password 3. Select service type (select Brewfather), 4. PATH / URI (enter your personal PATH / URI )
Unclaimed fields must be empty.
Brewfather Custom Stream to send the temperature of the thermometer from the relay: The Brewfather service must be marked and stored on the relay. Then a new field appears in the relay settings: Custom Stream URI in which you need to paste the Brewfather URL for the Custom stream.
Custom stream URI should look like example: /stream?id=123456789
The temperature appears on the application in an interval of 15 minutes.

 To set up a BrewSpy service, you need:
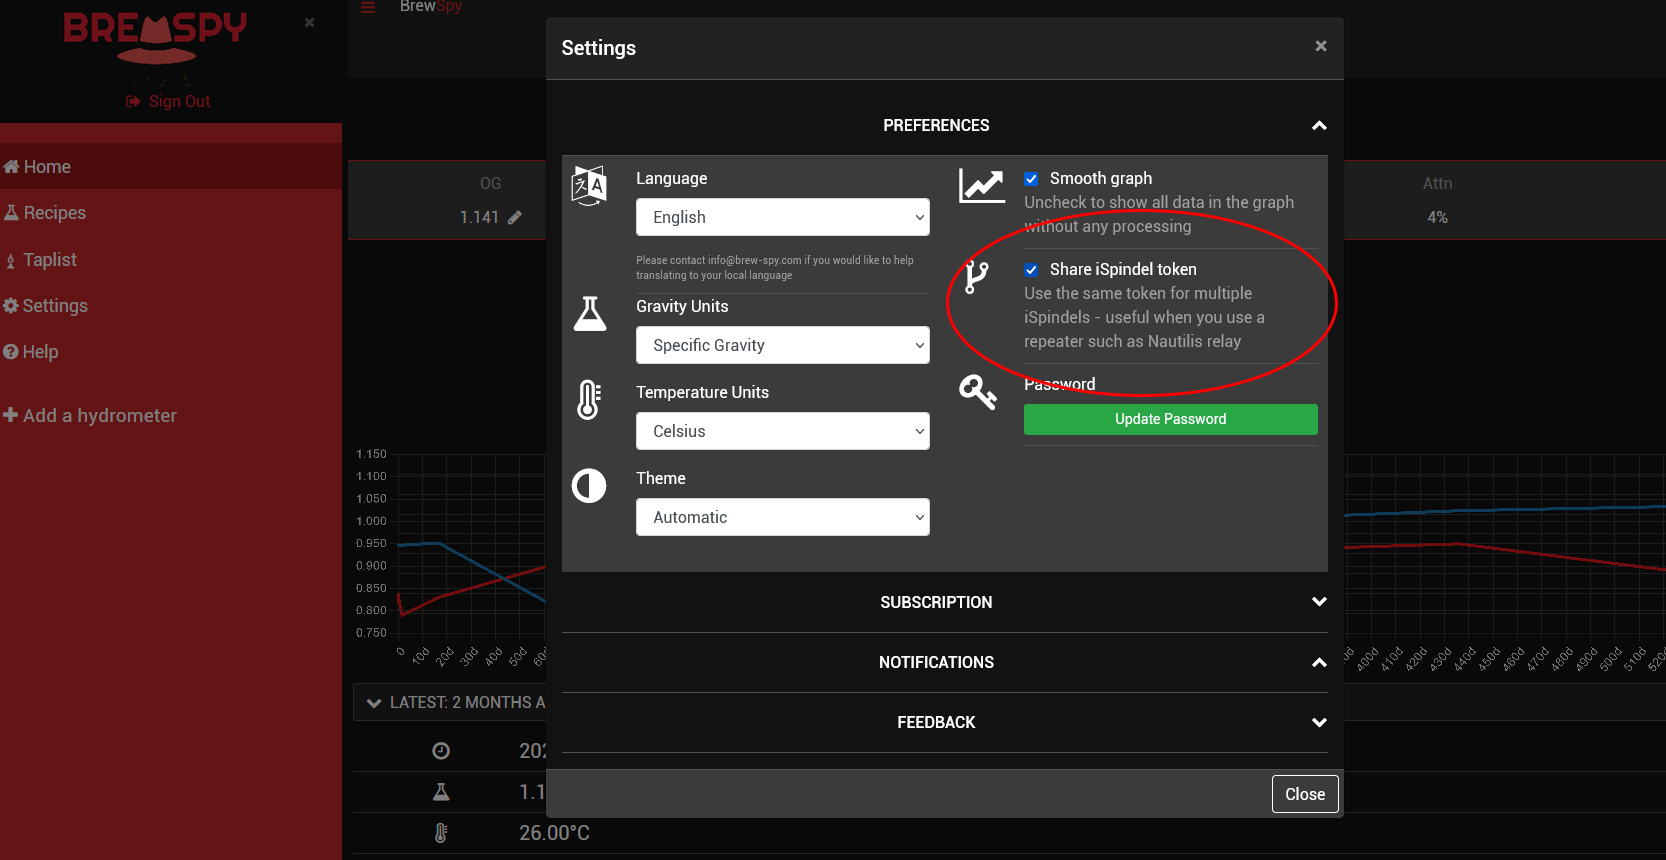
1. Network name (watch out for your WiFi network – be case sensitive), 2. Network password 3. Select service type (highlight BrewSpy), 4. TOKEN (your hydrometer token you use). BrewSpy service can use multiple hydrometers. The limitation is related to iRelay. So 1 iRelay can send data for 2 iSpindels. All you need is to check Share iSpindel token in Brewspy settings menu & Nautilis relay will do the rest.
Unclaimed fields must be empty.
BrewSpy Custom Stream to send the temperature of the thermometer from the relay: The BrewSpy service must be marked and stored on the relay. Then a new field appears in the relay settings: Custom Stream URI in which you need to paste the BrewSpy token from setup menu.
You can select the temperature sending interval of 5 or 15 minutes
To set up the Monitor.Beer service, you need:
1. Network name (watch your WiFi network name – be case sensitive), 2. Network password 3. Select service type (check Monitor.Beer), 4. PATH / URI (enter your personal PATH) / URI / ispindel /? Your username).
Unclaimed fields must be empty.
– In iSpindel settings, the interval must be set to at least 900 s (15min).
-The first time you connect to a service the name of your hydrometer is saved to the server and only then you can use it in the application. In the service, the calibration formula you are using must be specifically pasted.
 To set up the Grainfather service you need:
1. Network name (name of your WiFi network – pay attention to lowercase – uppercase letters), 2. Network password (password of your WiFi network) 3. Select service type (mark Grainfather), 4. PATH / URI (enter the url of your iSpindel).
Unclaimed fields must be empty. Currently, only 1 iSpindle can be connected to Grainfather.
– In the iSpindel settings, the interval must be set to at least 900 s (15min).
Grainfather Custom Controller to send the temperature of the thermometer from the relay: The Grainfather service must be marked and stored on the relay. Then a new field appears in the relay settings: Custom Stream URI in which you need to paste the Grainfather URI for the Custom controller.
Custom controller URI should look like example: /iot/abc-efg/custom
The temperature appears on the application in an interval of 15 minutes.
 To set up the Little Bock service you need:
1. Network name (name of your WiFi network – pay attention to lowercase – uppercase letters), 2. Network password (password of your WiFi network) 3. Select service type (mark Little Bock), 4. PATH / URI (enter the url of your iSpindel).
Unclaimed fields must be empty. Currently, only 1 iSpindle can be connected to Little Bock.
– In the iSpindel settings, the interval must be set to at least 900 s (15min).
 To set up the Brewers Friend service you need:
1. Network name (name of your WiFi network – pay attention to lowercase – uppercase letters), 2. Network password (password of your WiFi network) 3. Select service type (mark Brewers Friend), 4. PATH / URI (enter the url of your iSpindel: /ispindel_sg/API KEY Your API key can be found under Integrations. https://www.brewersfriend.com/homebrew/profile/integrations).
Unclaimed fields must be empty. Currently, only 1 iSpindle can be connected to Brewers Friend.
– In the iSpindel settings, the interval must be set to at least 900 s (15min).
 To set up the BrewBench service you need:
1. Network name (name of your WiFi network – pay attention to lowercase – uppercase letters), 2. Network password (password of your WiFi network) 3. Select service type (mark BrewBench), 4. TOKEN (enter iSpindel token) 5.PATH / URI (For SG enter the url. /ispindel_sg/ For Plato enter: /ispindel/
Unclaimed fields must be empty. Currently, only 1 iSpindle can be connected to BrewBench.
– In the iSpindel settings, the interval must be set to at least 900 s (15min).
You can see the details of the service on the website: https://www.brewbench.co/
-Firmware Update Over-the-Air programming (OTA) is a wireless upgrade of the device firmware. Opening the menu will open you an upgrade page. You find the latest firmware on the device you connected to the website and upload the same to the system. when you get the notification Ok, the firmware has been successfully upgraded.
-Audio alarm – If necessary, it is possible to turn off / on the audible alarm
– Management (Selecting the number of available hydrometers, SG or Plato unit for each iSpindel, P to SG conversion, set high, low alarms and gravity alarm)
– Termomether In the thermometer settings you can switch the thermometer on and off and when it is on select the unit in steps C or steps F. You can also change the low or high temperature alarm here.
– Measured data
-Reboot – Opening this link will reboot the device.
are available on the local website, so this option is optional. To manually set up the Blynk app, virtual pins are located at the bottom of the web page.

